Lydia Sweatt is a writer, bookworm, and bass guitar enthusiast. When she goes outside, a bicycle goes with her.
How to Blur Anything You Need to in Your YouTube Video

Phone numbers, passers-by, and license plate numbers are common things that often end up in YouTube video footage. But according to YouTube’s privacy guidelines, certain types of sensitive information - even if recorded by mistake - are never OK to post on the platform.
If you need a reliable way to clear your video of anything that really shouldn't be there, YouTube is on top of the problem.
To reduce the risk of identity theft and violation, the platform has created a tool for blurring objects and faces in creators’ videos. Best of all, the tool is free to use and easy to find in the YouTube Studio.
If you haven’t tried YouTube’s blur feature just yet, here’s everything you need to know to get started.
How to Find YouTube’s Blur Tool
- In the top right corner of YouTube, click on your profile icon and go to the YouTube Studio.
- On the left navigation menu, click ‘Videos’. This will show you all of the uploaded content on your channel.
- Mouse over the video you want to edit, then click the pencil icon to jump into that video.
- The next thing you’ll see is a page titled ‘Video details’. On this screen, find the left navigation menu and click ‘Editor’.
- When the next page loads, you’ll see a video timeline. Go directly below this editor and click the link that says ‘Blur Parts of Your Video’. You should see two menu options appear, one to create a face blur and another for custom blurring.
For real-time guidance, watch our video tutorial on how to find this section of the YouTube Studio.
How to Blur Objects in a YouTube Video
If you want to blur anything other than a face, your best option is to use YouTube’s custom blur tool. This feature allows you to place circular or rectangular blurs over different objects in a video.
A few weeks ago, we used the custom blur tool to hide an object in a vidIQ video. Rob, our YouTuber-in-residence recorded himself waving a red ‘subscribe’ button, and we were able to make it disappear - even with all those jerky movements.
This worked because YouTube lets you track the objects you’ve chosen to blur. All you have to do is find the Blur Behavior section on the video editor page and select ‘Track object’. If you don’t need to blur a moving object, select ‘Fix blur position’ to keep everything in place. You can see both options in the screenshot below:
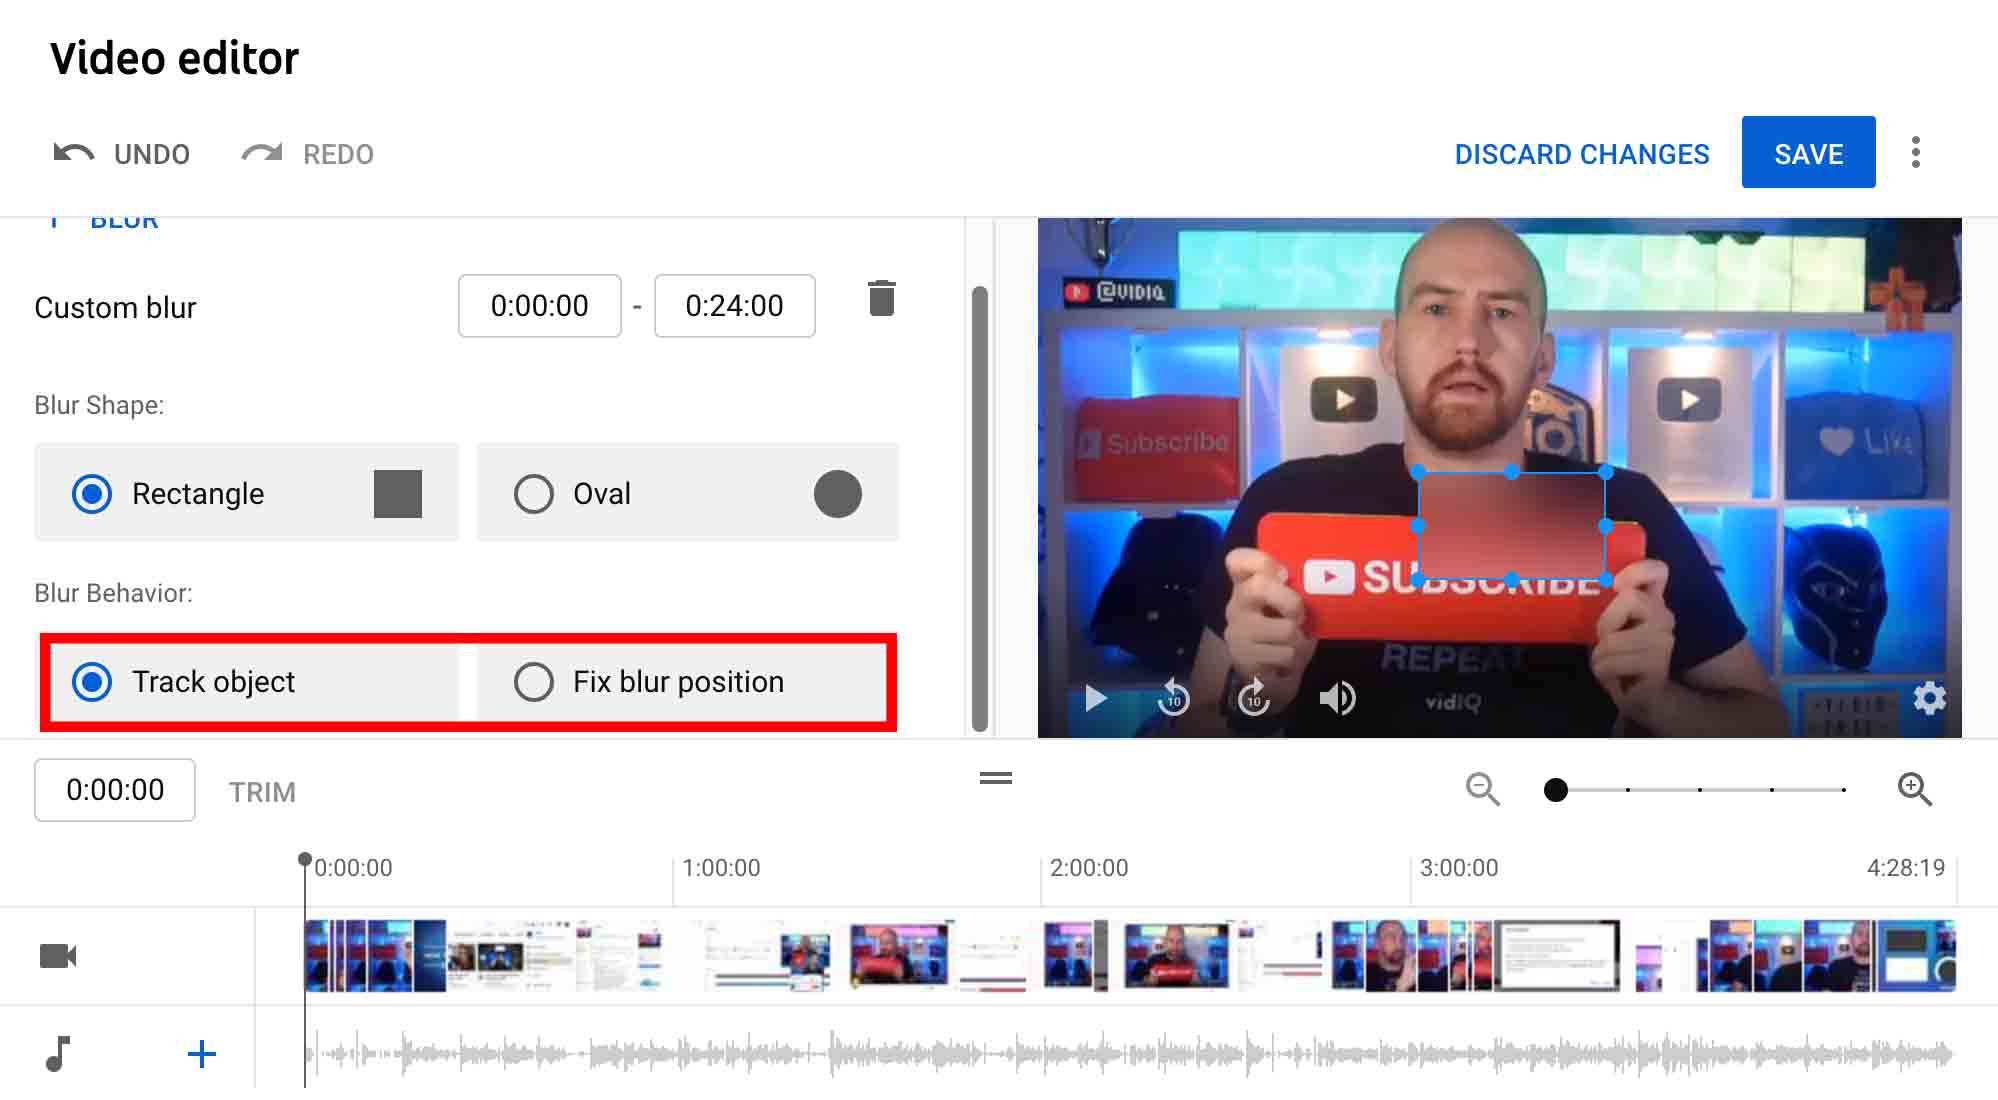
Once you make your selection, you can also reposition or resize your blur shape. To make Rob’s subscribe button disappear, we dragged a corner of the blur box, which is shown in the screenshot above, until it was big enough to hide everything underneath it.
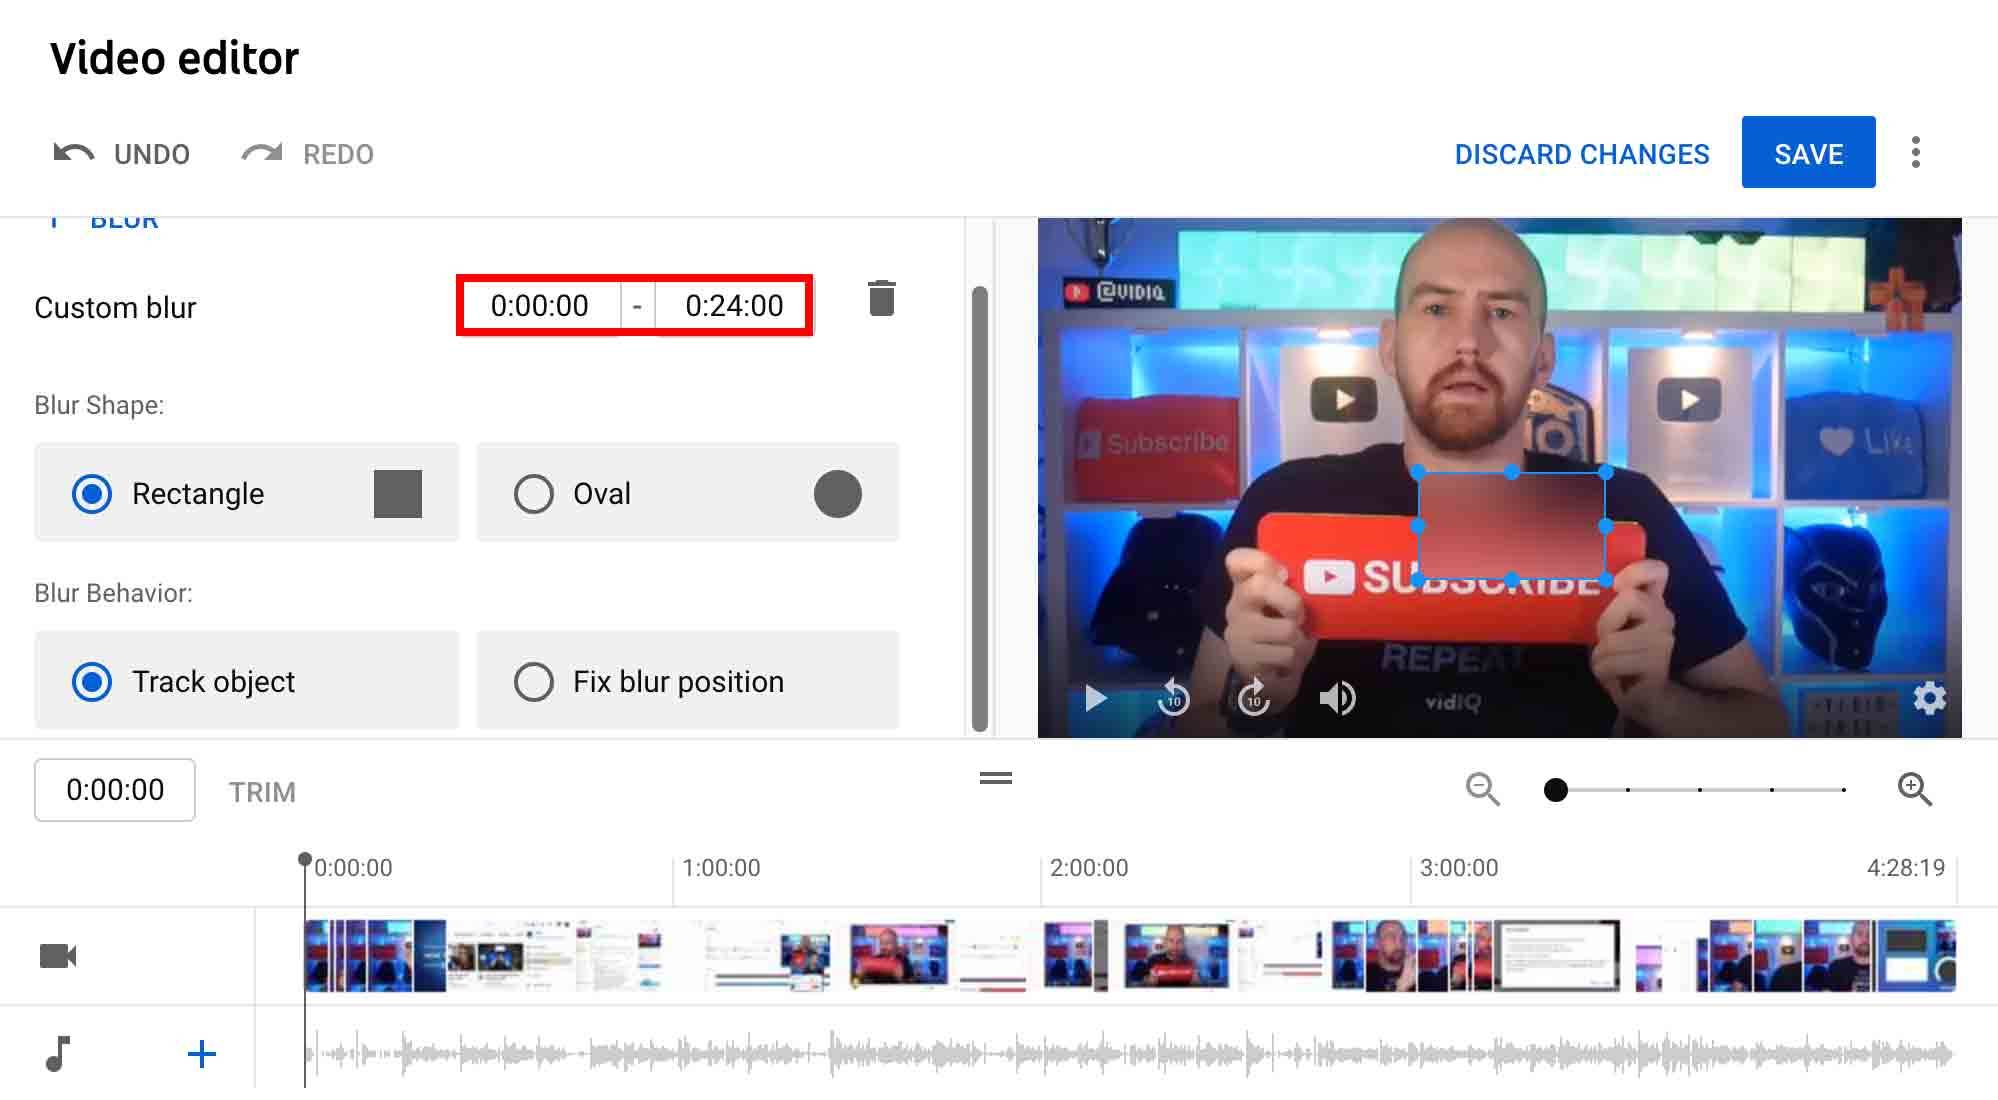
Lastly, you can determine when a blur appears in your video. To do this, go to the video timeline and drag the marker to any point. Then navigate upward and use the time indexes to define the duration of your blur, as shown below:
How to Blur Faces in a YouTube Video
The first time you try to blur a face, YouTube’s editor will spend a couple of minutes detecting all the faces in your video. When it does, you can easily select the ones you want to blur, as shown below:
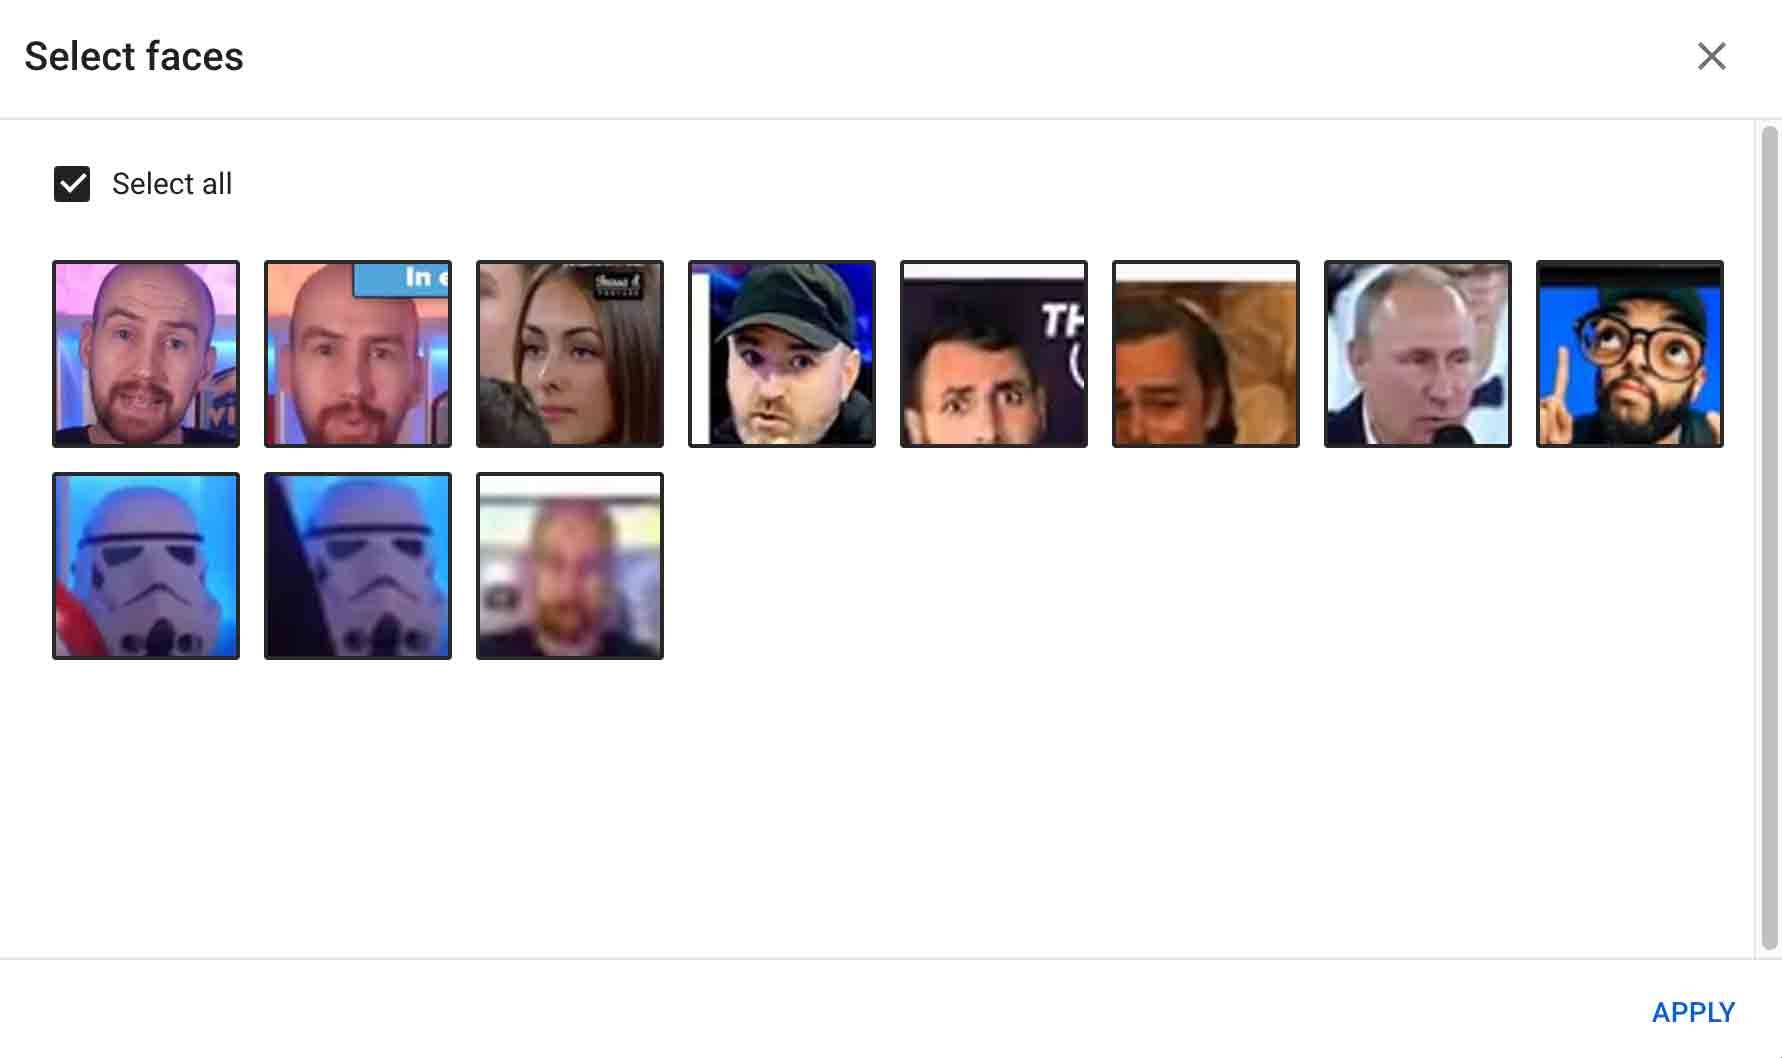
Luckily, that’s the only piece of new information when it comes to blurring a face. If you want to reposition the blur, track it to a moving face, or make it appear at a certain timestamp, you can repeat the steps we’ve already outlined in the custom blur section.
As you experiment with these blur tools, you may notice that they sometimes behave strangely. That doesn't take away from their helpfulness or convenience, but these small hiccups are good to know about:
- The tracking feature doesn't look perfect when you're editing, but it improves a lot when the video is fully processed.
- It can take a few hours for edits to stick. In the meantime, viewers will be able to see the original, unblurred video, if it's public.
- Sometimes the tool leaves faces unblurred for a fraction of a second, which can be frustrating.
- We also noticed an odd error while editing blur timestamps. The message ‘Blur region must contain at least one checkpoint’ kept appearing in the editor. We’re not sure what that’s about, but we fixed it by starting over until the error disappeared.
As helpful as YouTube’s blur tool can be, most creators probably use off-platform software to blur faces and objects. Of course, not every video editor has that kind of technology. And to be fair, YouTube does a good job of blurring and tracking objects with its free tool.
However, if the tool doesn’t perform as promised, go back a few steps to catch the root of the problem. As frustrating as that sounds, it’s a better alternative than exposing someone’s identity or information (or your own) without permission.
Want To Learn More YouTube Tips and Tricks?
If you want to take your YouTube channel to the next level and get more views on YouTube then make sure to download vidIQ. Join over 1 million other users and use vidIQ to help you research YouTube, analyze videos, audit your own channel, and take actionable steps click here to install now!
And if you’re really serious about growing your YouTube views and subscribers, sign up for exclusive access to the vidIQ Academy and learn how to launch a successful YouTube Channel in just 30 days.
